Design Course
Freehand Sketching
Rediscovering the Act of Sketching
by
Day 1
Introduction to Day 1
In today's two part session, we begin our exciting journey into mastering the art of freehand sketching by first assessing our current sketching process and ability. For this, we will do a quick object sketching exercise under 'Warm up'. It is important to video-record this first exercise for future reference. Trust us, it will be heartening to revisit this on the last day of the course, and see how much you have improved!
In the second part, under 'Workout', you will learn to draw parallel horizontal lines correctly. Do not forget to play music while doing the workouts!
From Day 2 onwards, we begin picking up the nuances of sketching in perspective under a third section 'Sense of Perspective Space'.
Preparation:
Since we are at the beginning this course, it will be very useful if you read through preparation again, to get a detailed overview of the materials and set up you will be needing during this entire course.
• Download and Print:
1. D1_Composition-of-3d-Objects_Exercise
2. D1_Perspective-View-of-Composition-from-South (Optional)
3. D1_Grid-Reference-Sheet-for-Workout_Session-1
• Grids: G1
• Paper: Cartridge sheet (for Warm up), Tracing sheets (for Workout)
• Stationery: Soft pencils (such as 2B, 4B or 6B), Long ruler and set squares preferably, for drawing the Grids.
• Music
Overall Time Plan: 2 hours
• Warm up : Setup time + 30 mins. (10 mins: Object sketching; 5 mins: Review of your sketch + 15 mins Review of the recorded video)
• Workout : Grid preparation time + 60 mins.
Warm up
1. Aim: Object sketching: Composition of 3D objects
• Understanding sketching of 3D objects
• Recording your current sketching ability
2. Set up:
• Set up a video or webcam - in a way that it captures the entire sketching area/sketch book as well as your hand actions and pencil grip.
• Download and prepare your sheet - Take a cartridge paper of size A3 or bigger. Download the worksheet of the 3D composition [Download....D1_Composition-of-3d-Objects_Exercise], cut along dotted lines and paste on your sheet, as shown below.
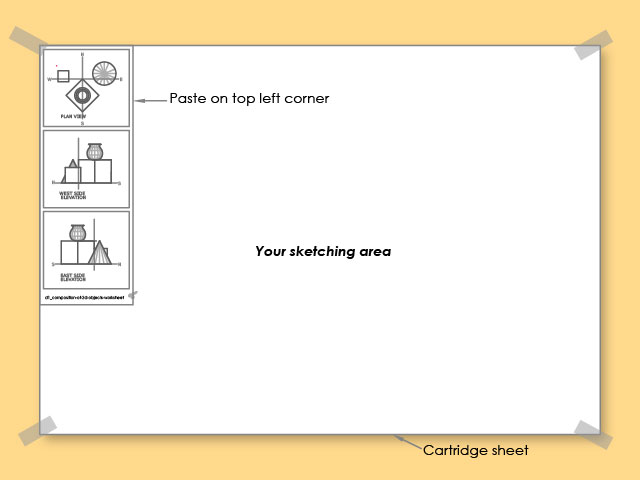
Image 1.1: Preparation of you sheet
3. Exercise:
Now, follow the steps below to sketch a 3D view of the composition, using the reference video and image provided:
1. Play the video 1.1 below to see perspective views of the composition (south west to south east).
2. Observe the image 1.3 of the perspective view of composition from south.
Use these to understand the way the objects look in 3D. You can also see their height relationships.
3. In the next 10 minutes, draw a sketch (a 3D view similar to those shown) from any ONE of the three alternative view points.
• From North west
• From North
• From North east
4. Try to finish it in less than ten minutes (Record your time). Remember to switch on the camera so that you get a video record of the sketching process.
Note: If you want to, you can refer the video again on your computer screen while sketching, as does the learner in the image 1.2 below, and even take a print out of the perspective view of composition from south provided for reference. D1_Perspective-View-of-Composition-from-South
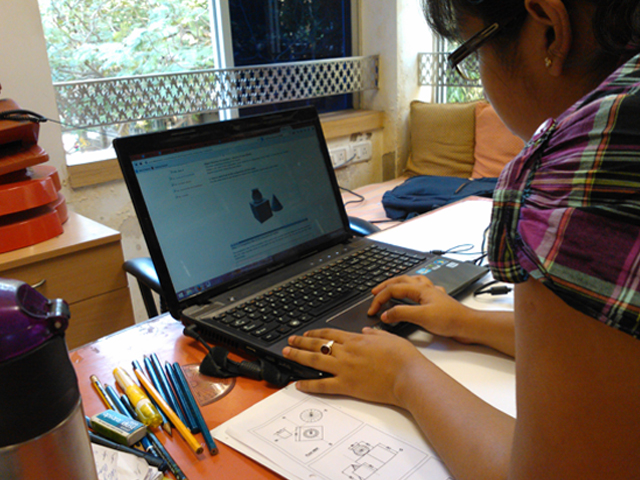
Image 1.2: A learner doing the exercise
Video 1.1: Composition View for 3D Sketch

Image 1.3: Perspective view of composition from south
4. Review:
(a) Review of your sketch: After you finish, review the sketch to study the correctness of the view and quality of lines drawn.
1. Are the locations of the objects correct? Click below to see the correct solution and compare.
[North west view] [North view] [North east view]
2. Does the sketch show the following:
• Are the vertical lines actually vertical?
• Do all parallel edges in the object vanish at the same point?
3. Are the line/s
• Thicknesses uneven?
• Crooked and discontinuous, when actually they should be straight and smoothly flowing?
• Drawn with uneven pressure (See the reverse side of the paper to see if the pencil has created depressions along the lines)
4. Are there a lot of eraser marks?
(b) Review of your sketching process:
Replay the 10 minute video you just shot to study the action of your hand and changes in the way the pencil is gripped. It may be helpful to read the article ‘Using Freehand Sketching to Think’ and look at your own actions. [Read more...Using Freehand Sketching to think] Does the video show that:
• You have rotated the paper to view the pasted plan from the side you wanted to draw?
• You have to hold/pause the sketching process and think at intervals
• There is too much use of eraser
• The way you hold the pencil changes for vertical and inclined lines?
• The lines are actually created by connecting small strokes
• You have rotated the paper to draw perspective lines
Can all this be avoided? The course you are about to undertake will help you overcome many of these errors while sketching. If you want to know more [Read more...Using Freehand Sketching to think]
5. Store the sketch and video for future reference. You can use this later to judge and self-assess the improvement in your own work.
<Warm up Ends>
Workout
1. Aim: Drawing Parallel Horizontal Lines correctly
• Improve line quality
• Control parallel-ness of line
• Control start and end points
2. Set up:
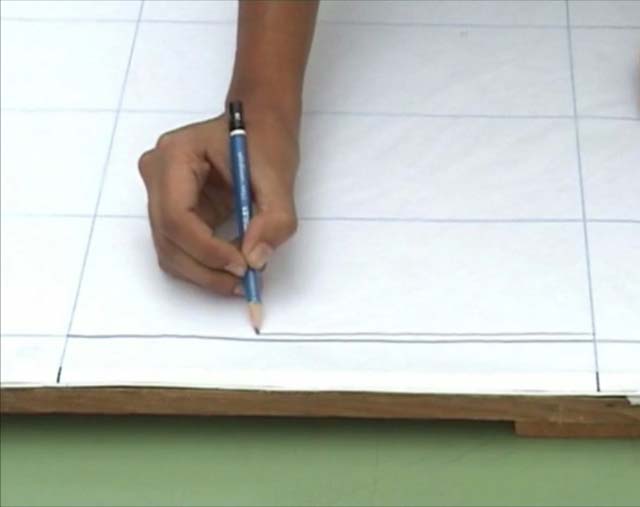
Image 1.4: Drawing on a tracing sheet overlay on the Grid
• Preparation of Grid: Individual grids are to be drawn on large cartridge sheets, referring to the Grid Reference Sheet provided [Download ...D1_Grid-Reference-Sheet-for-Workout_Session-1]. For today's Workout, you only need G1.
• Each tracing sheet is to be overlayed on the grid while doing the daily Workout, as shown in the image 1.4 above.
• Play music while doing the workouts, they must preferably have good variation of fast and slow tracks.
[Read more...Need for using music support]
• DO NOT use erasers.
• DO NOT use a measuring ruler or mark reference points/lines while doing the workouts. Depend ONLY on the grid underlay for this!
Note: All the grids that you prepare henceforth are to be preserved. You will be using them for other workouts later on as well.
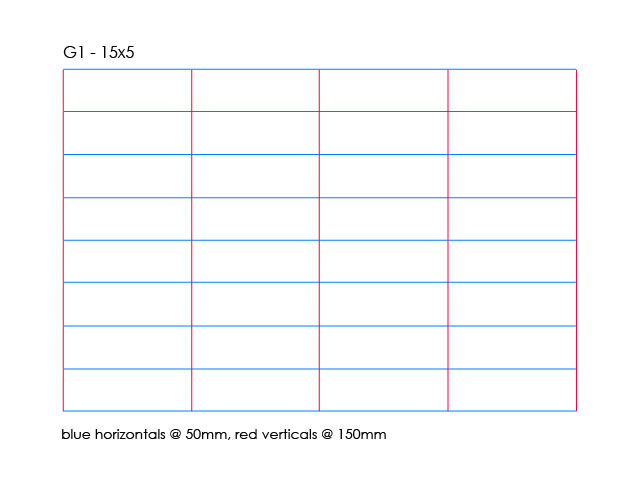
Image 1.5: Grid 1_15x5 with blue horizontal lines @50mm and red vertical lines @150mm
4. Body Posture:
For drawing good lines, is important to maintain your posture and execute body movement to ensure that the hand moves from the shoulder and the body moves along the direction of the line. Adopt the body posture shown in the subsequent video for today's exercises.
Video 1.2: Body Posture for drawing Horizontal Lines
5. Summary of exercises that follow:
Parallel Horizontal Lines
(a) Left to Right
(b) Right to Left
Variations explored: Varying lengths and Equidistant spacing by subdivision
Note: Try to complete the number of sheets within the time limit suggested for each.
1.1) Parallel Horizontal Lines – Left to Right/ Full Length: 10 mins. - 1 sheet
Objective: To develop control over horizontal parallel lines
On a tracing sheet overlay on grid G1, draw a series of Parallel Horizontal Lines from left to right, as shown in video 1.4, with hand movement as shown in video 1.3 below.
Video 1.3: Parallel Horizontal Lines: Left to Right, showing hand movement
Note: When you begin practicing, your focus must be on drawing all your lines parallel to gridlines below. It is natural that in the beginning your lines may droop down, float up and intersect other lines as you complete each line. In that case, leave a line gap below and start again, maintaining your lines parallel with the grid lines below.
The following video shows a learner practicing Parallel Horizontal Lines both Left to Right Full and Varying Lengths
Video 1.4: Parallel Horizontal Lines: Left to Right Full/Varying Length
1.2) Parallel Horizontal Lines – Left to Right/ Varying length: 10 mins. - 1 sheet
Objective: To develop control to stop lines at desired length
As shown in second part of video 1.4 above, draw Parallel Horizontal Lines of varying length (say 15, 30, 45 cm etc.) taking reference of the vertical lines on the grid underlay, G1. Try to control the end points of the line such that they are aligned along a vertical line. The grid underlay actually helps you do this. Practice this for 10mins. or until you feel confident. Do NOT draw any vertical reference lines of your own on the tracing sheet to align endpoints.
Did you vary your speed to ensure alignment of endpoints? We will learn more on the advantages of controlled speed while sketching on Day 3.
1.3) Parallel Horizontal Lines – Left to Right/ Equidistant Spacing: 10 mins. - 1 sheet
Objective: To develop control on control parallel-ness of line
Now that you will have more confidence over your line quality, try drawing 15 lines with equidistant spacing within each 5 cm grid. Lines are to be of 15, 30, 45 and 60 cm lengths. Here’s how:
• Draw parallel horizontal lines from left to right with G1 as underlay, starting with 3 lines within each 5cm grid to divide it into 4 equal parts (shown as grey lines in the image 1.6 below).
• Draw the next 4 lines, within these to make 8 equal parts (shown as black lines in image below).
• Repeat to create 16 equal parts.
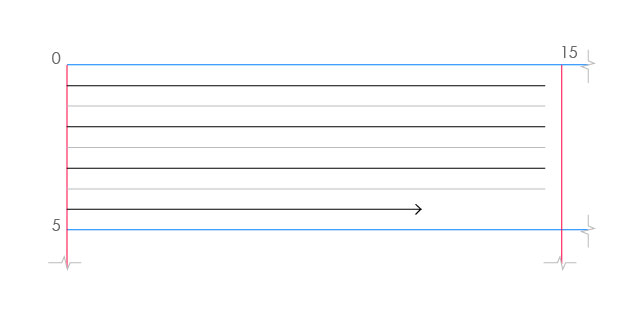
Image 1.6: Drawing Parallel Horizontal Lines with Equidistant Spacing by Subdivision
[Read more....Feeling the body movement internally]
1.4) Parallel Horizontal Lines – Right to Left/ Full Length: 10 mins. - 1 sheet
Objective: To develop control over horizontal parallel lines
On a tracing sheet overlay on grid G1, draw a series of Parallel Horizontal Lines in the Reverse direction (i.e. right to left), for the full length of grid.
1.5) Parallel Horizontal Lines – Right to Left/ Varying length: 10 mins - 1 sheet
Objective: To develop control to stop lines at desired length
Repeat now for Parallel Horizontal Lines for varying lengths from right to left for varying lengths (15cm, 30 cm, etc.)
[Read more....Fluency at any cost!]
Video 1.5: Parallel Horizontal Lines: Right to Left and of Varying Length
1.6) Parallel Horizontal Lines – Right to Left/ Equidistant Spacing: 10 mins - 1 sheet
Objective: To develop control on control parallel-ness of line
Now, retry this exercise of drawing 15 lines, with equidistant spacing within each 5 cm grid, now drawing from right to left. Lines are to be of 15, 30, 45 and 60 cm lengths.Do try completing this exercise in 5 minutes instead of the 10 minutes alloted for it.
________________________________________________________________________________
How well did you do in the Workout today?
Here are two samples of good and bad output by learners of the workout you just did, to judge your progress.
Do LOGIN to create a personal account of your daily progress, under PROGRESS DIARY. Through this you can also UPLOAD your work at the end of each day for peer/expert reviews and feedback on the FREEHAND SKETCHING DISCUSSION GROUP on d'square.

Image: day1-good-workout-sample

Image: day1-bad-workout-sample
<Workout and Day 1 End>
_______________________________________________________________________________
Day 2 Preview
Tomorrow we begin with Warm ups, reviewing what we did today and learn how to draw parallel vertical lines correctly in Workout. We also begin our third part of these daily sessions, 'Sense of Perspective Space', where we learn something new about how to sketch smart in Perspective, everyday!
IMPORTANT PRINTING INSTRUCTION: Henceforth, remember to set page size to A4 and choose 'Fit to Printable Area' option while printing the pdf sheets we have provided. It ensures all exercise base template/ comparison/solution sheets represent correct dimensions. This is to enable quick and easy cross-check of errors of the exercises we will be doing daily.
Downloads for Day 2:
1. D2_45-deg-10cm-Cube_Solution
2. D2_30-60-deg-10cm-Cube_Solution
________________________________________________________________________________
Create your Account,
Maintain your progress diary,
Upload files and
Join the Discussion Group Here
