Design Course
Freehand Sketching
Rediscovering the Act of Sketching
by
Day 14
Introduction to Day 14
Today, under Warm up, we quickly revise all Workouts in Sessions 1-3, and Day 13.
In today's session, we draw radial lines under Workouts.
For Sense of Perspective Space, we learn to draw fillets and work with corner radii.
Preparation:
• Download and Print:
1. D13_shroud-template (Optional, if shroud preserved from Day 13)
2. D13_Plate-Filleted-bends-worksheet
3. D13_filleted-cube-worksheet
4. D4_45-deg-10cm-cube-sheet
5. D4_30-60-deg-10cm-cube-sheet
6. D14_plate-with-filleted-bends-45-deg-solution-sheet
7. D14_plate-with-filleted-bends-worksheet-30-60-deg-solution-sheet
8. D14_filleted-cube-45-deg-solution-sheet
• Grids - G3 and G11
• Tracing sheets
• Soft pencils - 2B, 4B, 6B, etc.
• Measuring ruler/scale (for Sense of Perspective Space exercise today)
• Compass and Long ruler and set squares preferably, for drawing the Grid.
• Music
Overall Time Plan: 1.5 hours
• Warm up : 15 mins.
• Workout : 45 mins.
• Sense of Perspective Space : 30 mins.
Warm up
15 minute Exercise:
0-5 mins : Practice very fast hand and body movements while drawing Horizontal, Vertical and Inclined Lines, and all kinds of Curvatures recalling all earlier sessions.
5-15 mins : Now, repeat the various workouts covered in Session-1-4, and upto previous day WITHOUT the underlay grids using a SHROUD. Combining a shroud with the warm up exercise brings to focus both speed as well as fluency of drawing the lines.
While drawing these, remember to:
1. Draw them for various lengths, and diameters.
2. Draw lines in either direction and curvatures, both clockwise and anti-clockwise.
3. Draw them at various pace - fast, slow, fast to slow in a single line, etc.
Again, this practice of initially drawing the lines fast and then slowing down will help your body get into smoother drawing action for the workouts and perspective exercises ahead.
<Warm up Ends>
Workout
1. Aim: Drawing Radial Lines correctly
• Improve line quality
• Control radial-ness of line
• Control start and end points
Important Note: Try to finish all the exercises mentioned in this workout session within the first 40 minutes, since today's practice includes repeating today's entire workout session using a SHROUD in the last 20 minutes.
2. Set up:
• Tracing sheets, music
• Use soft pencils of different grades, interchangeably,
• Grids - square grid G3 and circular grid G11 (introduced in Sessions 1 and 3 respectively).
• DO NOT use erasers for the workouts.
3. Body Posture:
Video 14.0: Hand movement for drawing Radial Lines
Note: The forearm must remain perpendicular to the board edge
4. Exercises: Radial Lines
(a) Converging to a Point
(b) Diverging from a point
Variations explored: Circular and Square grids, use of Shroud
14.1) Radial Lines – Converging to a Point on a Circular Grid: 10 mins - 1 sheet
Objective: To develop control over radial lines
Draw converging radial lines with the circular grid G11 as underlay, using the marked points on the grid as starting points, for the following radii:
(a) 5cm ??????????
(b) 10cm
(c) 15cm
(d) 20cm
Note: After drawing a few lines, it is a good idea to check the length of the lines you draw using a ruler.
Video 14.1: Radial Lines Converging to a Point on a Circular Grid
Note: Try to maintain the normal signature grip even when the orientation of the line changes. With practice, the grip as well as the position of the forearm perpendicular to the board edge becomes natural while drawing, as was seen in video above.
14.2) Radial Lines – Diverging from a Point on a Circular Grid: 10 mins - 1 sheet
Objective: To develop control over radial lines
Similarly, draw radial lines diverging from a point on the circular grid underlay (grid G11). The end-points should inscribe a circle. Here again, practice for the following radii:
(a) 5cm
(b) 10cm
(c) 15cm
(d) 20cm
Video 14.2: Radial Lines Diverging from a Point on a Circular Grid
14.3) Radial Lines Converging at a Point on a Square Grid: 10 mins - 1 sheet
Objective: To develop control over radial lines
Now, draw converging lines (Use grid G3) such that starting points inscribe a circle, and the end-points converge onto a grid intersection. Draw for following radii:
(a) 5cm
(b) 10cm
(c) 15cm
(d) 20cm
Video 14.3: Radial Lines Converging at a Point on a Square Grid
14.4) Radial Lines Diverging from a Point on a Square Grid: 10 mins - 1 sheet
Objective: To develop control over radial lines
Now, using a the square grid underlay (grid G3), draw radial lines starting from one of the grid intersections. The end-points should inscribe a circle. Draw for following radii:
(a) 5cm
(b) 10cm
(c) 15cm
(d) 20cm
Video 14.4: Radial Lines Diverging from a Point on a Square Grid
14.5) Redo with Shroud: 20 mins - 1-2 sheets
Now, repeat all the exercises you did in the workout using a shroud on a circular grid G11 for the concluding 15 minutes of this workout session.
Note: In the beginning, to locate the starting point of the line, tracing back on the previously drawn line will be helpful.
<Workout Ends>
Sense of Perspective Space
Discussion: Fillets and Corner Radii in Perspective
How to handle fillets? Do you remember the Cylinder in cube exercise? A variation of it is used here to add fillet to a cube. In this case, a cylinder is drawn near the edge, of appropriate radii. With this clue in mind, do the following assignment.
1. Aim: Drawing Fillets and Working with Corner Radii in perspective accurately
(a) Bent Sheet Metal Part
(Oriented at (i) 45 deg or
(ii) 30-60 deg to Picture Plane)
(b) Filleted Cube
(Cube is oriented at 45 deg to Picture Plane)
2. Set up:
Tracing sheets, measuring ruler. Provided below are the Plans and 2 Side Elevations of
(a) Plate with Filleted Bends [Download...D13_metal-sheet-with-filleted-bends-worksheet].
(b) Filleted Cube [Download...D13_filleted-cube-worksheet]
3. Exercise:
Underlays for exercise:
[Download...D4_45-deg-10cm-cube-sheet].
[Download...D4_30-60-deg-10cm-cube-sheet].
Try to draw the filleted ends as accurately as possible.
SIMPLIFY AND REWRITE((((((Begin by first tracing over the 10cm base cubes provided earlier on Day-4 of Session-1 (or download them again here from the link provided below) as underlays to draw 3D views for:
(i) Plate with Filleted Bends - oriented at 45 degrees. [Download...D4_45-deg-10cm-cube-sheet].
(ii) Plate with Filleted Bends - oriented at 30-60 degrees. [Download...D4_30-60-deg-10cm-cube-sheet].
(iii) Filleted Cube - oriented at 45 degrees (same as D4_45-deg-10cm-cube-sheet used above).))))))))))))))))
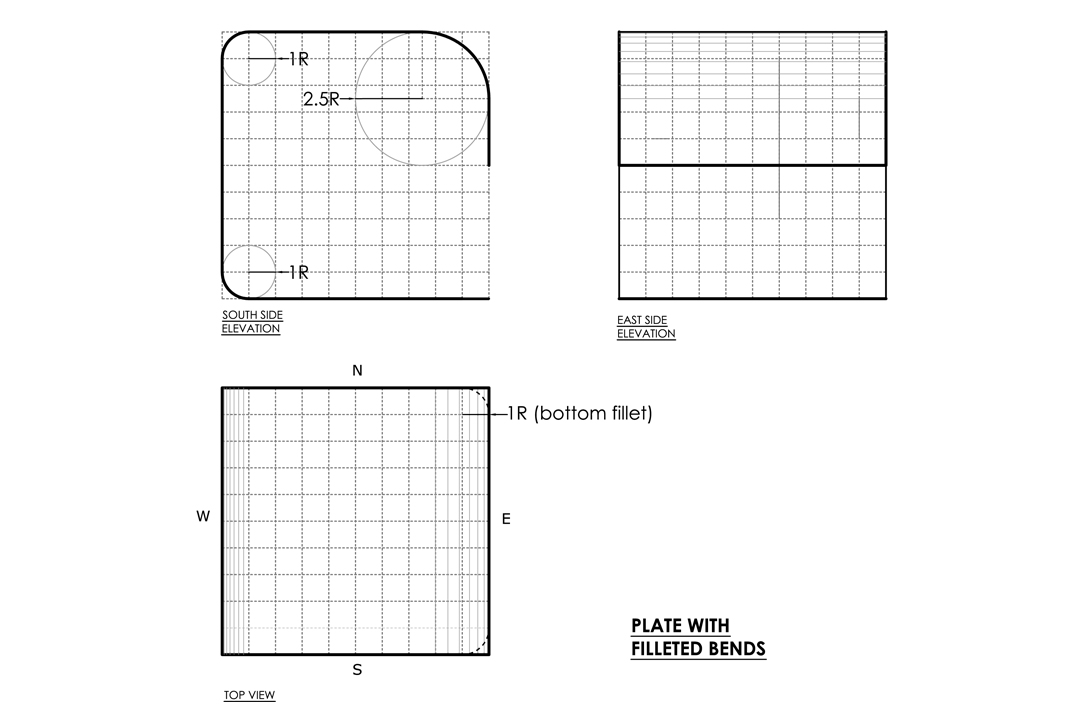
Image 14.1: Plate with Filleted Bends
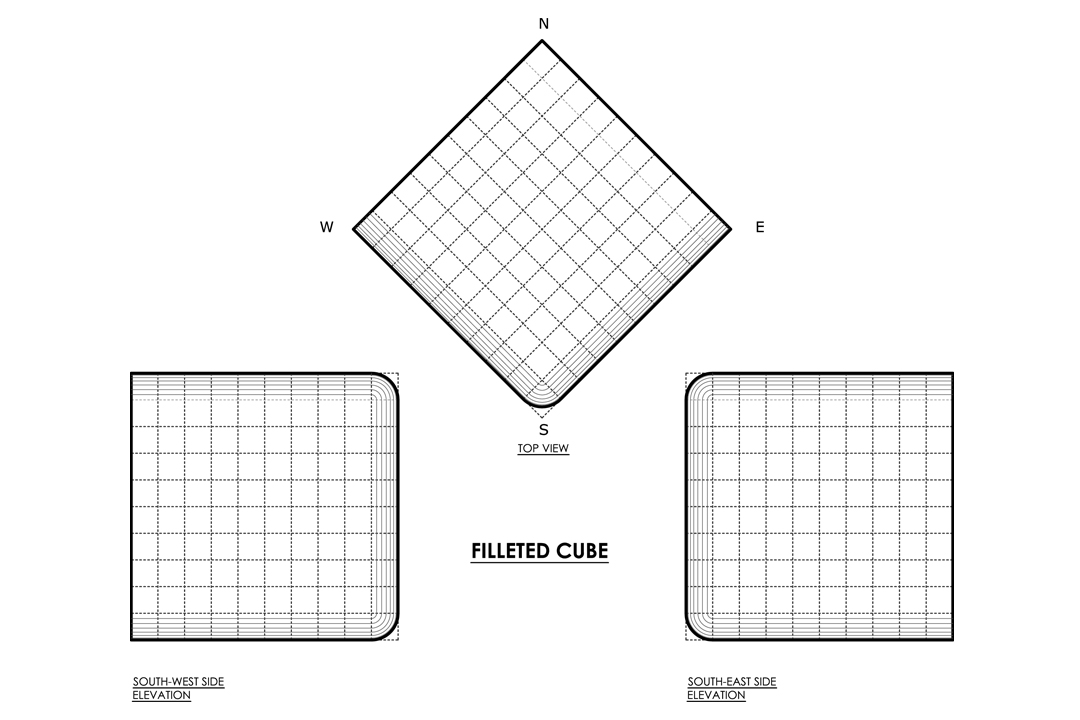
Image 14.2: Filleted Cube
3. Review:
After you finish, superimpose the tracing paper you drew on over correctly printed versions to review your solution and checking for any errors.
[Download...D14_plate-with-filleted-bends-45-deg-solution-sheet] [D14_plate-with-filleted-bends-worksheet-30-60-deg-solution-sheet]
[D14_filleted-cube-45-deg-solution-sheet]
HOW TO GET LINE WHERE PLANE STARTS CONVERTING TO CYLINDER - TANGENT-VERTICAL
< Sense of Perspective Space and Day 14 End >