Design Course
Freehand Sketching
Rediscovering the Act of Sketching
by
Day 5
Introduction to Day 5
Today, under Warm up, we quickly revise all that we did in the Workouts in Session 1.
Under Workouts, we learn to draw parallel inclined lines at 45 degrees correctly.
Under Sense of Perspective Space, we draw multiple cubes and cuboids in 2-point perspective, with atleast one cube/cuboid touching the picture plane.
Preparation:
• Download and Print:
1. D5_Grid-Reference-Sheet-for-Workout_Session-2
2. D5_Cubes-and-Cuboids-in-Perspective-Space_Exercise
3. D5_Cubes-and-Cuboids-in-Perspective-Space-at-45-deg_Solution
4. D5_Cubes-and-Cuboids-in-Perspective-Space-at-30-60-deg_Solution
• Grids: G4, G5 and G6
• Paper: Newsprint sheets (for Warm up), Tracing sheets
• Stationery: Soft pencils, Long ruler and set squares, Measuring ruler/scale
Overall Time Plan:
• Warm up : 15 mins.
• Workout : 60 mins.
• Sense of Perspective Space : 90 mins.
Warm up
15 minute Exercise:
0-5 mins : Practice very fast hand and body movements while drawing Horizontal and Vertical Lines.
5-15 mins : Repeat the workouts done in this Session-1 WITHOUT the underlay grids.
While drawing these, remember to:
1. Draw them for various lengths.
2. Draw them in either direction
3. Draw them at various pace - fast, slow, fast to slow in a single line, etc.
This practice of initially drawing the lines fast and then slowing down will help your body get into smoother drawing action for the workouts and perspective exercises ahead.
<Warm up Ends>
Workout
Discussion: Signature Grip
How do you grip your pencil? When you draw complex sketches, the lines occur in different orientations and they must be handled with fluency. What is then the ideal grip to ensure optimum fluency while sketching?
We find that the 'Signature Grip' makes your pencil grip more natural and allows you to fluently draw lines in any direction and orientation.
Thus we adopt Signature Grip as our new strategy to control pencil grip. From now on you begin each line with your signed initial and extend it into a continuous straight line. This ensures that you maintain normal writing grip for all of your lines, irrespective of direction. Observe the following video.
Video 5.1: Parallel Horizontal Lines drawn using Signature Grip
[Read more...sign-your-line]
Note: For all the exercises henceforth:
1) Adopt the signature grip till the signature grip become a normal way of drawing.
2) You may always start with signing of initials before every line for practice.
3) Check that your pencil grip does not change.
4) Keep changing the speed between and within the line, for practice.
1. Aim: Drawing Inclined Lines correctly
• Improve line quality
• Control parallel-ness of line
• Control start and end points
2. Set up:
• Tracing sheets, soft pencils, music
• Grid - You will need grid G4, G5 and G6 for today's session.
Remember to preserve all the grid sheets post Workout, for later use.
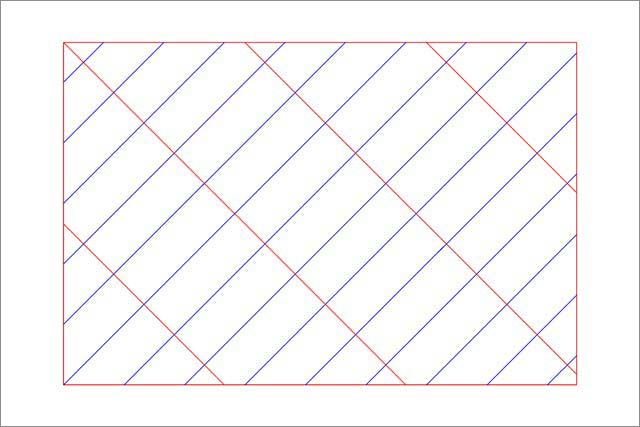
Image 5.1: Grid 4_45 deg. 5x15 with blue diagonals @ 50mm and red diagonals @ 150mm
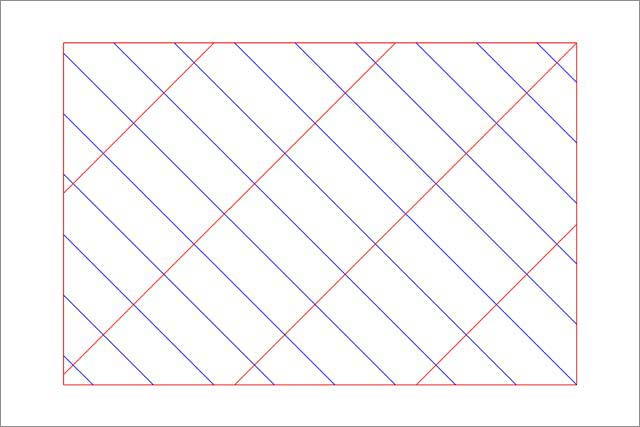
Image 5.2: Grid 5_45 deg. 15x5 with red diagonals @ 150mm and blue diagonals @ 50mm
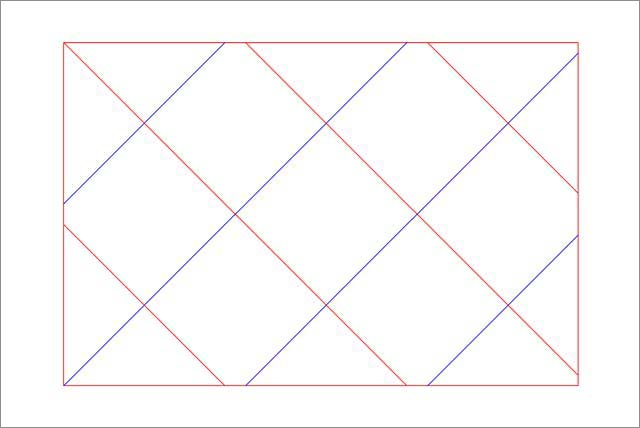
Image 5.3: Grid 6_45 deg. 15x15 with blue and red diagonals @ 150mm
4. Body Posture:
Keep your forearm perpendicular to the edge of the board and move it from the shoulder joint. This means the forearm will be at 45 degrees to the line drawn. You must bend and create a gap so that the forearm can move smoothly.
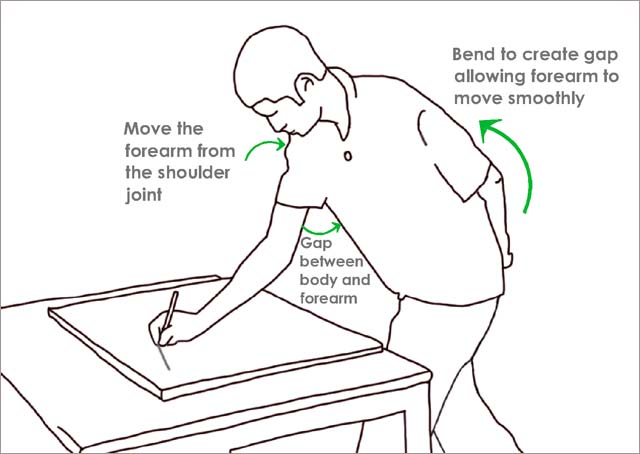
Image 5.2: Body Posture for drawing Inclined Lines
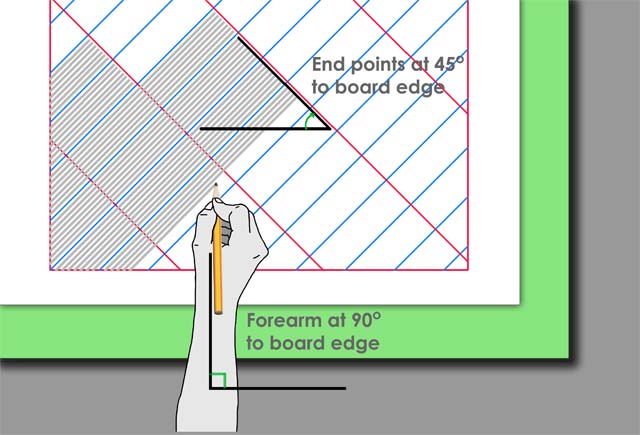
Image 5.3: Hand Position for drawing Inclined Lines
3. Exercises:
Parallel Inclined Lines @ 45 degrees, using Signature Grip
Variations explored: Varying lengths and Equidistant spacing by subdivision, Change of Pace and Starting/Ending Away from Grid.
Signature Grip
3.1) Parallel Inclined Lines @ 45 deg./Varying Length: 10 mins - 2 sheet
Objective: __________________
On a tracing sheet overlay with grid G4 below, draw parallel inclined lines of 45 degree inclination of various lengths, taking reference of the inclined lines on the grid template. Try to control the end points of the line such that they fall in 45 degree alignment. Refer to Image 5.3 above (hyperlink). Do this for both directions, i.e. from bottom left to top right, then top right to bottom left.
3.2) Parallel Inclined Lines @ 45 deg./Equidistant Spacing: 10 mins - 1 sheet
Once you are confident, try the following:
Draw 45 lines, with equidistant spacing within each 15cm 45 degree grid of 15, 30, 45 and 60 cm lengths as we did before for the parallel horizontal and vertical lines. Use Grid Template T6 for this.
3.3) Parallel Inclined Lines/Fast Pace: 5 mins - 1 sheet
Objective: To regulate speed of drawing inclined lines
Now, on a tracing sheet overlay with grid G4 below, draw parallel inclined lines at fast pace. Practice for both directions.
3.4) Parallel Inclined Lines/Slow Pace: 5 mins - 1 sheet
Objective: To regulate speed of drawing lines
On a tracing sheet overlay with grid G4 below, draw parallel inclined lines at slow pace. Practice for both directions.
3.5) Parallel Inclined Lines/Very Slow Pace: 2.5 mins - 1/2 sheet
Objective: To regulate speed of drawing lines
On a tracing sheet overlay with grid G4 below, draw parallel inclined lines at very slow pace. Practice for both directions.
3.6) Parallel Inclined Lines/Fast to Slow: 5 mins - 1 sheet
Objective: To regulate change in speed
On a tracing sheet overlay with grid G4 below, draw parallel inclind lines from fast to slow. Practice for both directions.
3.7) Parallel Inclined Lines/Slow to Fast: 5 mins - 1 sheet
Objective: To regulate change in speed
On a tracing sheet overlay with grid G4 below, draw parallel inclined lines from slow to fast. Practice for both directions.
3.8) Parallel Inclined Lines/Slow to Fast, with greater control:2.5 mins - 1/2 sheet
Objective: To regulate change in speed
On a tracing sheet overlay with grid G4 below, draw parallel inclined lines from slow to fast, with greater control. Practice for both directions.
3.9) Parallel Inclined Lines/Starting away from grid: 2.5 mins - 1/2 sheet
Objective: To develop control over vertical parallel lines
Draw inclined lines, such that they start 2 cm away from grid. Use grid G4 as underlay. Make sure that the alignment of start and end points is maintained.
3.10) Parallel Inclined Lines/Ending away from grid: 2.5 mins - 1/2 sheet
Draw inclined lines, such that they start and end 2 cm away from grid. Use grid G4. Make sure that alignment of start and end points is maintained.
Parallel Inclined Lines of 45 degrees inclination from Top Right to Bottom Left
Now, reverse your direction of drawing the line, i.e. start from top Right and end at bottom Left.
Next, draw Parallel Inclined lines of 45 degrees inclination from bottom Right to top Left. Use Grid Template T5 for this.
Attachment Size ![]() Day-5-Parallel-Inclined-Lines-of-45-degrees-inclination-from-bottom-Right-to-top-Left.mp4
Day-5-Parallel-Inclined-Lines-of-45-degrees-inclination-from-bottom-Right-to-top-Left.mp41008.44 KB
Parallel Inclined Lines of 45 degrees inclination from bottom Right to top Left
Remember to repeat the same in reverse direction, i.e. from top Left to bottom Right.
Note: Observe that the forearm is at 45 degrees to the line. Practice this.
Parallel Inclined Lines @ 45 degrees with Change of Pace
Draw Parallel Inclined Lines @ 45 degrees from Left to Right, and then from Right to Left by changing the pace as follows:
1) Change Pace : Fast, Slow
2) Change Pace within the Line: Fast to Slow, Slow to Fast.
Parallel Inclined Lines @ 45 degrees Starting and Ending Away from Grid
Also practice drawing Inclined Lines @ 45 degrees by Starting and Ending away from Grid, as we did in the first session by predefined distances (2cm, 3cm, 4cm away, etc.) ensuring alignment of start and end points. Use pace change while drawing for better alignment control.
45 lines - hyperlink to horz
<Workout Ends>
Sense of Perspective Space
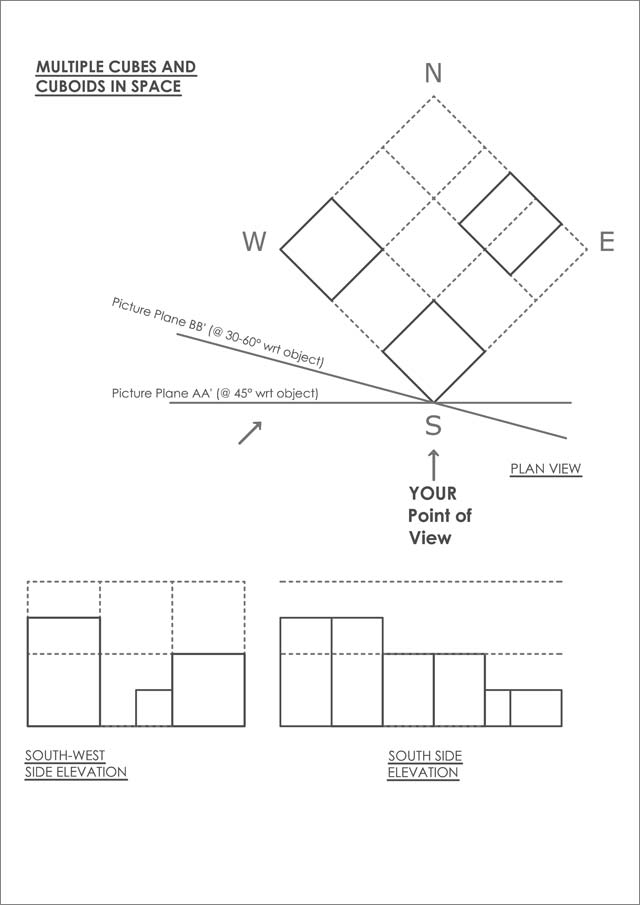
Objective: Drawing Multiple Cubes and Cuboids in Space
Provided below is the Plan and 2 Side Elevations of a cube and two cuboids in space. Start by drawing the 3cm cube that touches the picture plane. Proceed by using your freehand sketching ability to do a proportionate 3D sketch of this composition for:
(a) Picture Plane AA', oriented at 45 degrees with respect to object.
(b) Picture Plane BB', oriented at 30-60 degrees with respect to object.
[Download...D5_Cubes-and-Cuboids-in-Perspective-Space_Exercise]
After you finish, review the sketch to study the accuracy of perspective in your drawn composition.
Click below to see the correct perspective views and compare:
[D5_Cubes-and-Cuboids-in-Perspective-Space-at-45-deg_Solution] [D5_Cubes-and-Cuboids-in-Perspective-Space-at-30-60-deg_Solution]
Have you been able to estimate the locations accurately? How can you achieve a cube in perspective placed behind or at half distance to the first cube? Recall from Dimension Control in Perspective discussed earlier. We can also generate a Floor Grid in Perspective out of a single reference cube, and then use it as reference. We will learn how to do this systematically in the next Day Session.
<Sense of Perspective Space and Day 5 End>
Day 6 Preview
Tomorrow under Warm up, we quickly revise all that we did in the Workouts in Session 1 as well as Day 5.
Under Workouts, we learn to draw parallel inclined lines at 30-60 degrees correctly.
Under Sense of Perspective Space, we draw geometric objects in 2-point perspective, using a 45 degree floor grid, with atleast one of the objects touching the picture plane.
Downloads for Day 6: Remember this important PRINTING INSTRUCTION while printing!
1. D6-7_Geometric-Objects-in-Perspective-Space-1_Exercise
2. D6_45-deg-Floor-Grid
3. D6_Geometric-Objects-in-Perspective-Space-1-at-45-deg_Solution