Design Course
Freehand Sketching
Rediscovering the Act of Sketching
by
Day 15
Introduction to Day 15
Today, under Warm up, we quickly revise all Workouts in Sessions 1-3, and upto Day 14.
In today's session of radial lines and
1. D15_Switchboard_Exercise
2. D15_30-60-deg-3cm-Floor-Grid-with-additional-reference-lines
3. D15_Switchboard_Solution
Preparation:
Grid: G11
Overall time Plan:
• Warm up: 15 mins
• Workout: 45 mins.
• Sense of Perspective Space : 90 mins.
Warm up
15 minute Exercise:
0-5 mins : Practice very fast hand and body movements while drawing Horizontal, Vertical and Inclined Lines, Curvatures recalling all earlier sessions, using SHROUD.
5-10 mins : WITHOUT shroud, radial lines ONLY.
Now, repeat the various workouts covered in Session-1-4, i.e. upto previous day WITHOUT the underlay grids using a SHROUD. Combining a shroud with the warm up exercise brings to focus both speed as well as fluency of drawing the lines.
While drawing these, remember to:
1. Draw them for various lengths, and diameters.
2. Draw lines in either direction and curvatures, both clockwise and anti-clockwise.
3. Draw them at various pace - fast, slow, fast to slow in a single line, etc.
Again, this practice of initially drawing the lines fast and then slowing down will help your body get into smoother drawing action for the workouts and perspective exercises ahead.
<Warm up Ends>
Workout
1. Aim: Drawing Radial Line Rings, Quadrants and Semi-circles correctly
• Improve line quality
• Control radial-ness of line
• Control start and end points
Important Note: Try to finish all the exercises mentioned in this workout session within the first 30 minutes, since today's practice plan includes repeating today's entire workout session using a SHROUD in the last 15 minutes.
15.1) Lines Passing Through a Point - 5 mins. - 1 sheet
On the circular grid underlay (grid G11), draw lines passing through the centre to such that the start and end-points inscribe a near circle. Do this for the following radii:
(a) 5cm
(b) 10cm
(c) 15cm
(d) 20cm
DOUBLE- REPEAT ARROW
 Lines Passing Through a Point
15.2) Diverging and Converging Radial Line Rings - 10 mins: 1 sheet
Now, on the circular grid underlay (grid G11), draw radial lines such that the outer circle and inner circle are created with sufficient accuracy, as shown below, for the following radii:
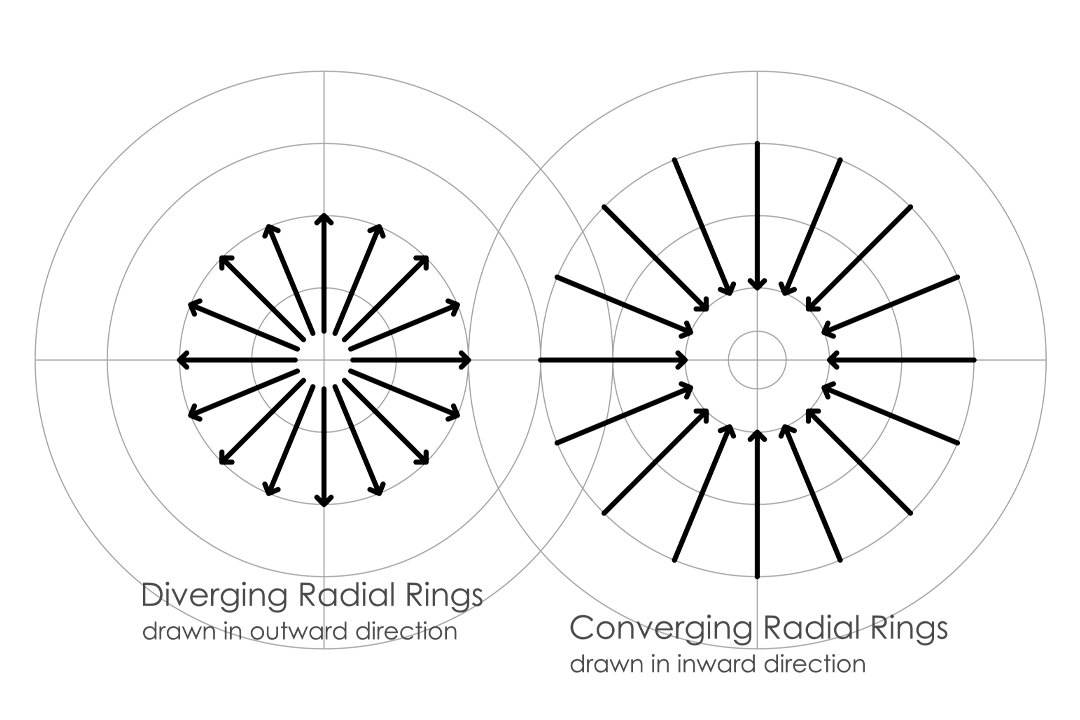
(a) Inner circle 2cm - Outer circle 10cm
(b) Inner circle 5cm - Outer circle 20cm
(c) Inner circle 10cm - Outer circle 15cm
Similarly, repeat the three variations mentioned above for drawing converging radial rings by starting at the outer circle and going inwards.
Note: You must reduce the pace for better control in stopping at a desired point.
15.3) Radial Line Quadrants and Semi-circles - 15 mins - 1 sheet
Do NOT use any grid for this. Draw radial lines such that the start/end points inscribe quarter or half circles - at various orientations, as shown in the example below. Try drawing all of these clockwise, then repeat anti - clockwise.
4 - SHOW ONLY FIRST QUADRANT ORIENTATION - 1 THING EACH

Image 15.3: Radial Line Quadrants and Semi-circles
Do this for the following radii:
(a) 5cm
(b) 10cm
(d) 15cm
(2) Now draw the radial lines that do not intersect in the centre to create radial rings for
(a) Inner circle 2cm - Outer circle 10cm
(b) Inner circle 5cm - Outer circle 20cm
15.4) Redo with Shroud - 15 mins - 1 sheet
Now, repeat some of the exercises you did in the workout using a shroud for the concluding 15 minutes of this workout session.
<Workout Ends>
Sense of Perspective Space
Discussion: Product Based Underlays

Image 15.4: Product Based Underlay for ON/OFF switch iterations
Notice how in the image 15.4 above, a simple cuboid on a plane with some thickness in perspective serves as a product based underlay for ideation. Here the Product Based Underlay helps the designer to create multiple 'explorations', using tracing sheets over it. One has just to get the perspective correct once - i.e. do the basic massing (as in the plane and cuboid in perspective shown above). Then on one can just keep changing the final look/ make variations on this basic 'Product Based Underlay'.
This is especially useful when sketching/ ideating for more complex objects.
When designing directly in perspective, some basic masses can be plotted on a perspective grid, and one can proceed onto doing variations on overlay i.e. tracing sheets.
1. Aim: Drawing Products using Product Based Underlays
2. Set up: Use multiple tracing sheets (you can cut them into A4 size for convenience or keep shifting your tracing sheet for each iteration).
3. Exercise: Today we will draw a simple product, using a product based underlay. This is an open-ended exercise. Imagine that you have to redesign the switchboard shown in the image 15.5 below. Using the 30-60 floor grid, draw a simple, correctly drawn plate, and give it some thickness. Add a cuboid in the centre for a switch and a cylinder for the regulator, and draw atleast 5 different design iterations for the switch and regulator. For a start see some variations done in image 15.4.
DIMENSION!! - GIVE FLOOR GRID LIKE THE ONE UDDI GAVE!!!

Image 15.5: Switchboard for redesign
4. Review: Self-assess your iterations and grade them.
< Sense of Perspective Space and Day 15 End >