Design Course
Freehand Sketching
Rediscovering the Act of Sketching
by
Day 4
Introduction to Day 4
Today, under Warm up, we quickly revise all that we did in the Workouts on Day 1,2 and 3.
We have a surprise test for you under Workout, followed by a line quality self-assessment through composition sheets, using parallel horizontal and vertical lines.
Under Sense of Perspective Space, we test how well you can now sketch a cubic object in 2-point perspective. You do a self-assessment of the same, using comparison sheets provided after the exercise.
Preparation:
• Download and Print:
1. D4_Estimation-of-Length_Test
2. D4_Cubic-Object_Exercise
3. D4_45-deg-10cm-Cube
4. D4_30-60-deg-10cm-Cube
5. D4_Cubic-Object-at-45-deg_Solution
6. D4_Cubic-Object-at-30-60-deg_Solution
• Cartridge sheets (for Warm up and Workout Test)
• Tracing sheets (for Sense of Perspective Space: Test)
• Soft pencils - 2B, 4B, 6B, etc.
• Music
Overall Time Plan: 1 hour
• Warm up : 15 mins.
• Workout test : 15 mins.
• Sense of Perspective Space: Test : 30 mins.
Warm up
15 minute Exercise:
0-5 mins : Practice very fast hand and body movements while drawing Horizontal and Vertical Lines.
5-15 mins : Repeat the workouts done in this Session-1 WITHOUT the underlay grids.
While drawing these, remember to:
1. Draw them for various lengths.
2. Draw them in either direction
3. Draw them at various pace - fast, slow, fast to slow in a single line, etc.
This practice of initially drawing the lines fast and then slowing down will help your body get into smoother drawing action for the workouts and perspective exercises ahead.
Why warm ups?
________________________________________________________________________________
<Warm up Ends>
________________________________________________________________________________
Workout Test
________________________________________________________________________________
Aim: Estimating Lengths Accurately
________________________________________________________________________________
After practicing with lines for so many days, can you now just take a look at a line and guess its length accurately? We will find out now! Download the sheet provided and follow the instructions below to complete the test. [Download......D4_Estimation-of-Length_Test]
2. Instructions:
1. Use ONLY your visual judgement.
2. DO NOT subdivide the line to estimate the length.
3. Exercise: Assume 'A' provided on the test sheet as the 'unit' length. Estimate length of each of the lines in terms of A and note it down on your sheet.
4. Review:
Once you complete all 16 lines, cross-check your guesstimation accuracy with the answers provided on the same sheet.
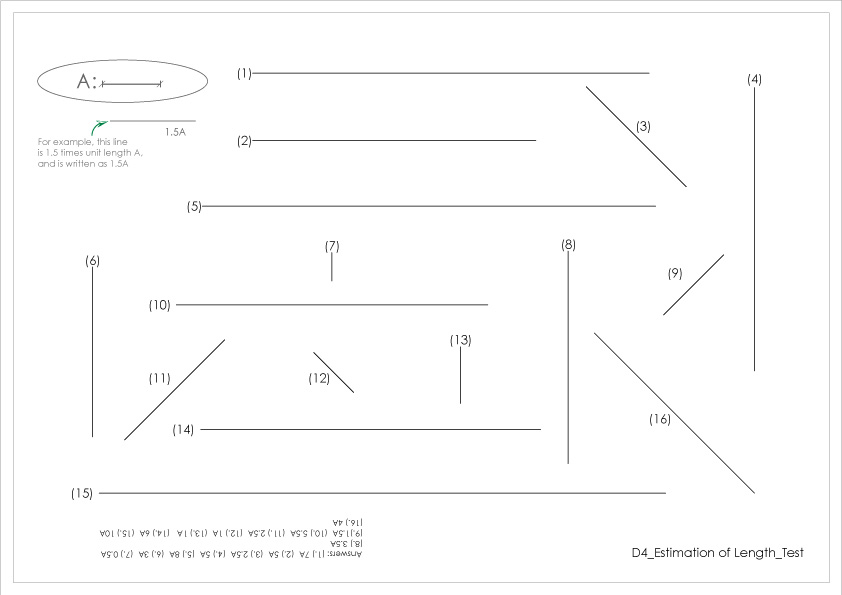
Image 4.1: Estimation of Length Test
________________________________________________________________________________
Aim: Line Composition
• Maintain uniformity of size, thickness and pressure
• Final composition sheet must look neat, well balanced and pleasing.
• Tests your line control
________________________________________________________________________________
2. Instructions:
1. All lines must start and end to form neat, straight edges, refer image 4.2 below.
2. All lines should have uniform darkness.
3. All lines should be straight and smooth.
4. DO NOT use Grids.
5. Reverse drawing direction intermittently.
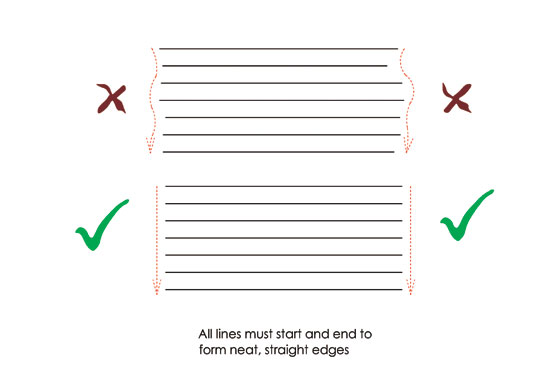
Image 4.2: All lines must form neat, straight edges
3. Exercises:
Task-1: Draw 20 equidistant lines of approximately 25 cm each, as shown in the image 4.3 below for:
(a) Parallel Horizontal Lines Left to Right, refer (i) - 1 sheet
(b) Parallel Vertical Lines Top to Bottom, refer (ii) - 1 sheet
(c) vertical and horizontal line combination, refer (iii) - 1 sheet. Note that
Note: For (iii), the successive points where the lines bends at 90 degrees
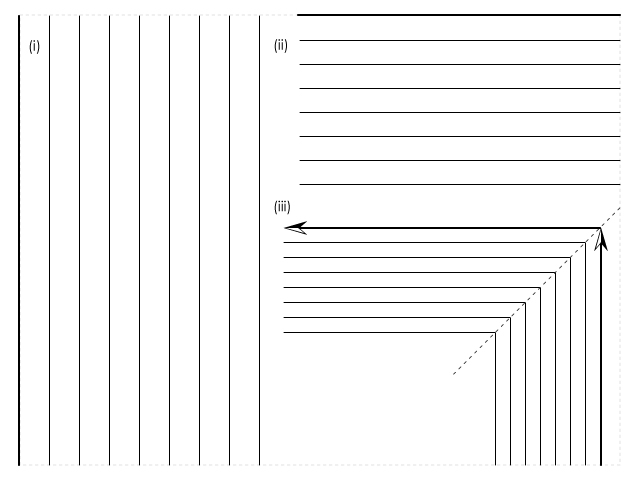
Image 4.3: Task-1
How accurately could you draw these lengths?
Task-2: Draw lines of same length along a path
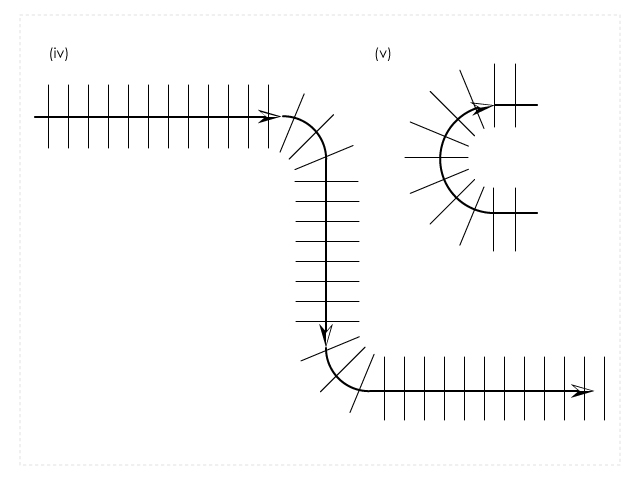
Image 4.4: Task-2
Task-3:
To test estimation of flow lengths, draw 5 successive rectangles where:
(a) the width remains same, length decreases by 4cm (begin with rectangle b=10cm, l=20cm)
(b) squres of increasing sides (increment value 4cm)
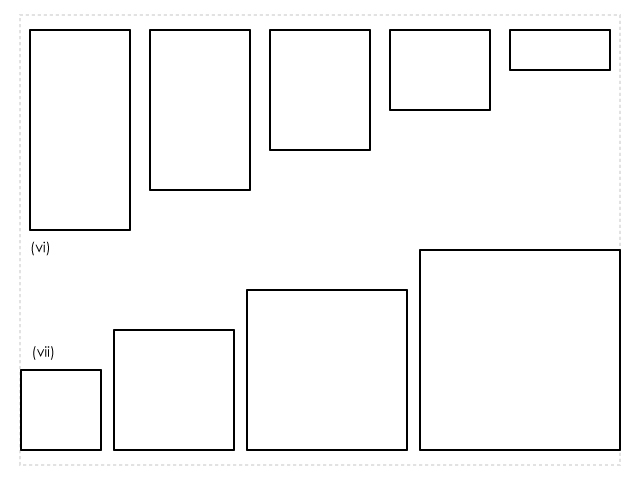
Image 4.5: Task-3
4 Review:
Does your composition look neat?
Are all the lines uniform?
Consider all these aspects and grade yourself out of 10 (For a start, treat a 10 as excellent, 9 or 8 as good, 7 or 6 as fair and 5 as just acceptable.)
<Workout Test Ends>
________________________________________________________________________________
Sense of Perspective Space: Test
________________________________________________________________________________
1. Aim: Drawing a Cubic Object in Perspective correctly
(Cube is oriented at (i) 45 deg and
(ii) 30-60 deg to Picture Plane)
________________________________________________________________________________
2. Set up: Do the following exercise on tracing sheets. Ensure that you are using correctly printed base cube underlays for doing the exercise. Refer to the downloaded comarison sheets ONLY after you are done with the exercise.
3. Exercise:
Provided below is the Plan and 2 Side Elevations of a simple cubic object [Download...D4_Cubic-Object_Exercise]. Begin by tracing over the 10cm base cubes provided and draw the 2-Point Perspective views of the same with
(a) Picture Plane AA', oriented at 45 degrees wrt object [Download...D4_45-deg-10cm-Cube].
(b) Picture Plane BB', oriented at 30-60 degrees wrt object [Download...D4_30-60-deg-10cm-Cube].

Did you face any difficulty in figuring out any intermediate junction points? We will learn how to subdivide a cube in the next session.
4. Review:
After you have completed the sketch, click below to see the correct perspective views and compare:
[D4_Cubic-Object-at-45-deg_Solution] [D4_Cubic-Object-at-30-60-deg_Solution] Give yourself marks out of 10, as per your assessment. (For a start, treat a 10 as excellent, 9 or 8 as good, 7 or 6 as fair and 5 as just acceptable, with 4 and below as dissatisfactory. However, if you've given yourself a 4 or below, don't worry - by the time we are done with the course, you will have converted your 'dissatisfactory' to 'excellent'!
<Sense of Perspective Space: Test and Day 4 End>
________________________________________________________________________________
--------------------------------------<< End of SESSION 1 >>------------------------------------------
________________________________________________________________________________
Day 5 Preview
Tomorrow we begin with Warm ups, revise all that we did in the Workouts in Session 1.
Under Workouts, we learn to draw parallel inclined lines at 45 degrees correctly.
Under Sense of Perspective Space, we draw multiple cubes and cuboids in 2-point perspective, where atleast one of them touches the picture plane.
Downloads for Day 5: See PRINTING INSTRUCTION first.
1. D5_Grid-Reference-Sheet-for-Workout_Session-2
2. D5_Cubes-and-Cuboids-in-Perspective-Space_Exercise
3. D5_Cubes-and-Cuboids-in-Perspective-Space-at-45-deg_Solution
4. D5_Cubes-and-Cuboids-in-Perspective-Space-at-30-60-deg_Solution
________________________________________________________________________________