Design Course
Freehand Sketching
Rediscovering the Act of Sketching
by
Day 10
Introduction to Day 10
Today, under Warm up, we quickly revise all that we did in the Workouts in Session 1 and 2, and Day 9.
Under Workouts, we learn to draw Ellipses and Semi-ellipses correctly.
In today's Sense of Perspective Space section, we learn to draw a Vertical Cylindrical Object of Varying Radii use a vertical reference grid of circular planes to We have taken a Sportscap Waterbottle for practice.
Preparation:
• Download and Print:
1. D10_Sportscap-Waterbottle_Exercise
2. D10_Circular-Planes-in-Perspective_Vertical-Reference-Grid
3. D10_Sportscap-Waterbottle_Solution
• Tracing sheets
• Soft pencils - 2B, 4B, 6B, etc.
• Measuring ruler/scale (for Sense of Perspective Space exercise today)
• Compass and Long ruler and set squares preferably, for drawing the Grid.
• Music
Overall Time Plan: 2 hours 50 minutes
• Warm up : 15 mins.
• Workout : 65 mins.
• Sense of Perspective Space : 90 mins.
15 minute Exercise:
5 mins : Practice very fast hand and body movements while drawing Horizontal, Vertical, Inclined Lines Circles and Semi-circles
10 mins : Repeat the various workouts covered in Session-1, 2, and 3, and upto previous day WITHOUT the underlay grids, using the hand NOT normally used (as discussed on Day 9).
While drawing these, remember to:
1. Draw them for various lengths, and diameters.
2. Draw lines in either direction i.e. left to right, right to left and curvatures, both clockwise and anti-clockwise.
3. Draw them at various pace - fast, slow, fast to slow in a single line, etc.
This practice of initially drawing the lines fast and then slowing down will help your body get into smoother drawing action for the workouts and perspective exercises ahead.
<Warm up Ends>
Workout
Discussion: Ellipses:
An ellipse is a smooth closed curve which is symmetric about its horizontal and vertical axes. The longer axis of the two is called the major axis and the other, the minor axis.
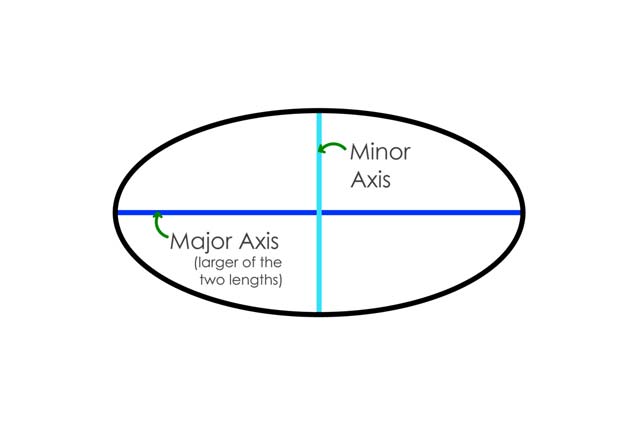
Image 10.1: Major and Minor Axes of an Ellipse
1. Aim:Drawing Ellipses and Semi-circles correctly
• Improve line quality
• Control ellipse-ness of ellipse
• Improve fluency
2. Set up:
• Tracing sheets, soft pencils, music
• Grid - This day utilizes the first three grids (G1, G2 and G3) introduced in Session-1.
3. Body Posture:
Observe the following video for hand movement for drawing ellipses
10.1) Horizontally Oriented Concentric Ellipses: 15 mins - 2 sheets
Keeping the major axis along the horizontal with G1 grid as underlay, draw concentric ellipses for each of the following values, first clockwise, then anti-clockwise:
(a) Major 10cm and Minor 5cm
(b) Major 15cm and Minor 7.5cm
(c) Major 20cm and Minor 10cm

Image 10.2: Horizontally Oriented Concentric Ellipses
Note: Concentrated ellipses are to be drawn with uniform pressure and thickness, without changing the direction of drawing, and preferably without lifting the pencil before completing each full ellipse. Further note that your objective while drawing is to maintain your hand position as if you were drawing a vertical line.
For improving control, practice drawing ellipses inbetween any two concentric ellipses. Further subdivide by drawing two ellipses on either side between the existing ellipses and the ones you just drew, to get four equally spaced out concentric ellipses, as shown in figure below.
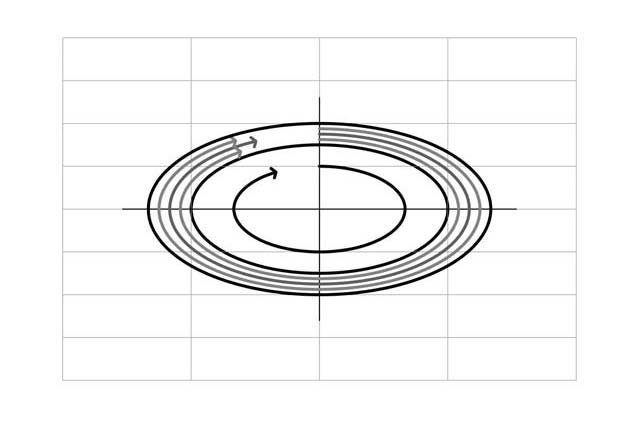
Image 10.3: Drawing ellipses between two concentric ellipses
Do try by changing the starting points while drawing as you did earlier for circles, on the previous day.
Now, once confident, beginning with the largest drawn ellipse of major axis 20cm and minor axis 10 cm, proceed to draw successive ellipses inwards, decreasing each radius by 2cm for major axis and 1cm for minor axis until you reach 2cm and 1cm major and minor axes respectively.
10.2) Horizontally Oriented Ellipses with Constant Axes - 15 mins - 2 sheets
Using G1 grid as base reference, draw horizontally oriented ellipses on an overlay sheet for the following:
(a) Constant Major Axis: Varying minor axis length by 2cm successively. Practice this for major axis values of 10 and 15cm.
(b) Constant Minor Axis: Varying major axis length by 2cm successively. Practice this for minor axis values of 15 and 20cm.

Image 10.4: Horizontally Oriented Ellipses with Constant Axes
10.3) Vertically Oriented Concentric Ellipses - 10 mins - 2 sheets
Similarly, using G2 grid as underlay and keeping the vertical now as the major axis, draw horizontally oriented concentric ellipses, first clockwise, then anti-clockwise for the following:
(a) Major 10cm and Minor 5cm
(b) Major 15cm and Minor 7.5cm
(c) Major 20cm and Minor 10cm
Beginning with the largest drawn ellipse of major axis 20cm and minor axis 10 cm, proceed to draw successive ellipses inwards, decreasing each radius by 2cm for major axis and 1cm for minor axis until you reach 2cm and 1cm major and minor axes respectively. Also practice by drawing ellipses in between two ellipses and changing the starting points, as discussed earlier.
10.4) Vertically Oriented Ellipses with Constant Axes - 10 mins - 2 sheets
Using G2 grid as base reference, and the vertical as the major axis, draw ellipses for the following:
(a) Constant Major Axis: Varying minor axis length by 2cm successively. Practice for major axis values of 10 and 15cm.
(b) Constant Minor Axis: Varying major axis length by 2cm successively. Practice for minor axis values of 15 and 20cm.
As practiced earlier, start with 20cm vertical major axis and 10cm horizontal minor axis and draw successive ellipses inwards as you did in earlier exercise for horizontal ellipses.
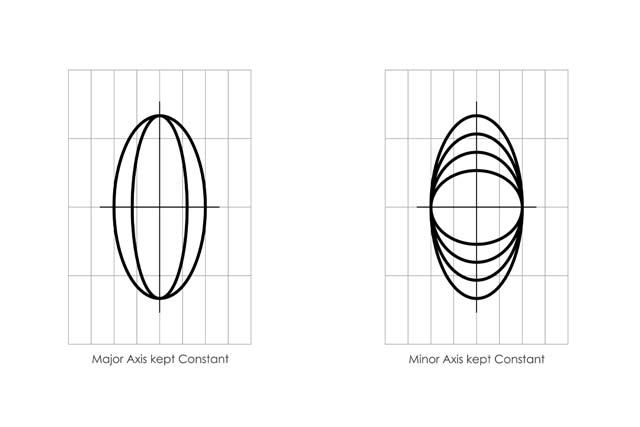
Image 10.5: Vertically Oriented Ellipses with Constant Axes
10.5) Concentric Semi-ellipses on a Square Grid - 10 mins - 1 sheet
Practice drawing concentric semi-ellipses on an overlay with the square grid G3 below, with 2cm increment in axis length with every subsequent semi-ellipse.
To avoid the frequently observed error of tapering or unusual flattening near end points, extend the drawn line both ways to ensure the desired curve, as you did for semi-circles on the previous day.

Image 10.6: Avoiding flattening or tapering of curve near the end-points of a semi-ellipse
Note: Remember to approach the axis with a straight line first, and then start curving at the axis, and reverse this when you are about to end the curve.
Now, practice by starting at different points on the axis, and also by changing direction (anti-clockwise, then clockwise).
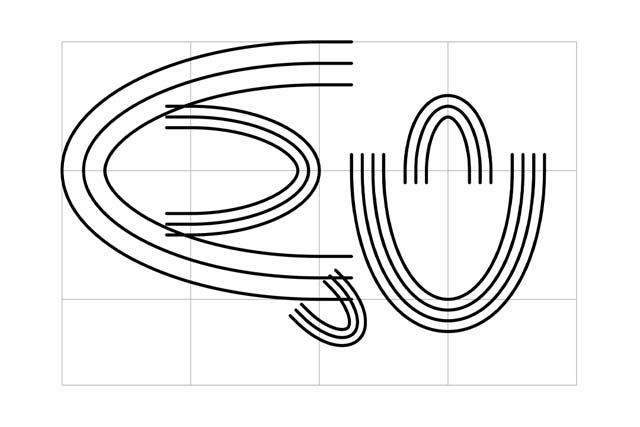
Image 10.7: Concentric Semi-ellipses on a Square Grid
10.6) Closed Floating Semi-Ellipses - 5 mins - 1 sheet
Draw closed floating semi-ellipses of varying the radii. Practice with changing starting points and the direction of drawing. Do NOT use a grid for this exercise.

Image 10.8: Closed Floating Semi-ellipses
<Workout Ends>
Sense of Perspective Space
Objective: Drawing a Vertical Cylindrical Object of Varying Radii: Sportscap Waterbottle
Provided below is the Plan and Elevation of a Sportscap Waterbottle [Download...D10_Sportscap-Waterbottle_Exercise]. Using an overlay on the base reference sheet, draw a 3D view of the same. [Download...D10_Circular-Planes-in-Perspective_Vertical-Reference-Grid]
Note: Not all reference planes that required to complete the sketch are marked on the grid provided below. You are to create your own intermediate planes and reference ellipses from the nearest planes already provided in it. The radii of the fillets (indicated by R, such as R50 in the worksheet below) are suggestive, and need not be followed exactly. Use your judgement for these edges.

Sportscap Waterbottle
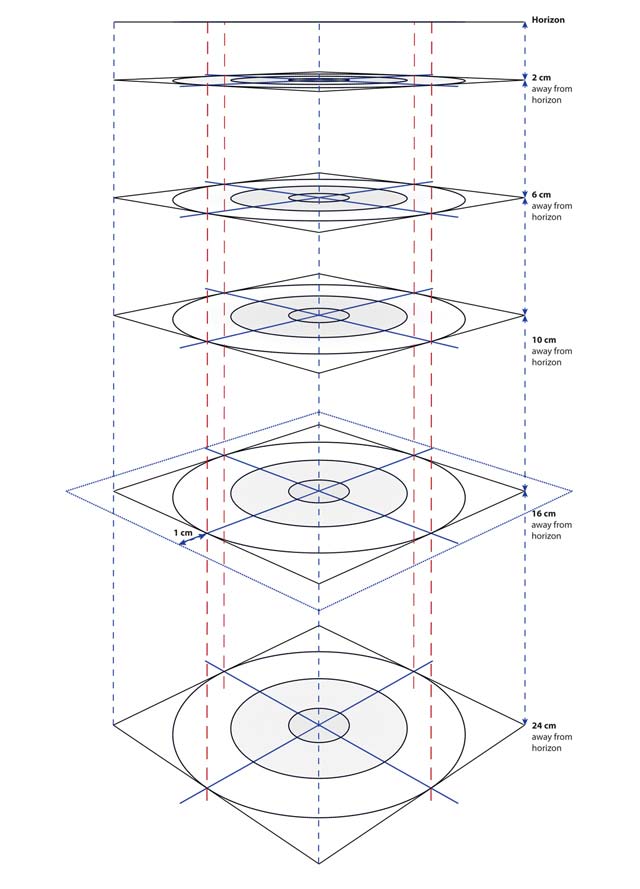
Circular Planes in Perspective Grid_in Vertical Orientation
Do try drawing the lettering on the bottle too. We will formally learn how to do the lettering on cylindrical and curved surfaces in one of the subsequent sessions (Refer: Session 7: Strip Forms and Lettering)
Compare your drawing by overlaying it on a correctly printed version of the solution provided. [Download...D10_Sportscap-Waterbottle_Solution]
< Sense of Perspective Space and Day 10 End >
Day 11 Preview
Tomorrow, under Warm up, we quickly revise all that we did in the Workouts in Session 1 and 2, upto Day 10.
Under Workouts, we learn to draw Quadrants and Segments correctly.
In Tomorrow's Sense of Perspective Space, we learn to draw a tapering cylindrical object in two-point perspective, and also cut its two sections
Downloads for Day 11: See PRINTING INSTRUCTION first.
1. D11_Composite-Object-1_Exercise
2. D4_45-deg-10cm-Cube (optional, if preserved from Day 4)
3. D4_30-60-deg-10cm-Cube (optional, if preserved from Day 4)
4. Composite-Object-1_Solution
5. Composite-Object-1-Vertical-Section-45-deg_Solution
6. Composite-Object-1-Vertical-Section-30-60-deg_Solution