Design Course
Freehand Sketching
Rediscovering the Act of Sketching
by
Day 8
Day 08
Introduction to Day 8
Today, under Warm up, we quickly revise all that we did in the Workouts in Session 1 and 2, upto Day 7.
For Workout test, we do a line quality self-assessment through composition sheets, using parallel inclined lines.
Under Sense of Perspective Space, we test how you sketch geometric objects in 2-point perspective, when none of the objects touch the picture plane! You do a self-assessment of the same, using comparison sheets provided after the exercise.
Preparation:
• Download and Print:
1. D8_geometric-objects-in-perspective-space-2-worksheet
2. D8_geometric-objects-in-perspective-space-2-at-45-deg-solution-sheet
3. D8_geometric-objects-in-perspective-space-2-at-30-60-deg-solution-sheet
• Cartridge sheets (for Warm up and Workout Test)
• Tracing sheets (for Sense of Perspective Space Test)
• Soft pencils - 2B, 4B, 6B, etc.
• Music
Overall Time Plan: 1 hour 15 minutes
• Warm up : 15 mins.
• Workout test : 30 mins.
• Sense of Perspective Space test : 30 mins.
Warm up
15 minute Exercise:
0-5 mins : Practice very fast hand and body movements while drawing Horizontal, Vertical and Inclined Lines
5-15 mins : Repeat the various workouts covered in Session-1, and upto inclined lines @ 60-30 degrees of the previous day WITHOUT the underlay grids, using SIGNATURE GRIP.
While drawing these, remember to:
1. Draw them for various lengths.
2. Draw them in either direction
3. Draw them at various pace - fast, slow, fast to slow in a single line, etc.
This practice of initially drawing the lines fast and then slowing down will help your body get into smoother drawing action for the workouts and perspective exercises ahead.
<Warm up Ends>
Workout Test
1. Aim: Drawing inclined line variations correctly
• Control on edges is important while drawing bands of inclined lines, so ensure that all lines start and end to create neat edges.
Instructions:
• Do NOT use grids or measuring ruler.
• Do NOT mark any reference lines or points, unless specifically mentioned.
• The drawing direction is specified by arrows in each case.
1. Tasks-1 to 3: Equidistant inclined lines: Draw 10 equidistant lines as shown in images 8.1-3 below in each case. In each case, may only cross-check your angles with a protractor, AFTER you draw the first line, before proceeding to draw all lines.
Note: Do NOT draw the black guidelines shown in some of the images below either, they are for explanation purposes only.

Image 8.1: Workout Test Sheet-1

Image 8.2: Workout Test Sheet-2
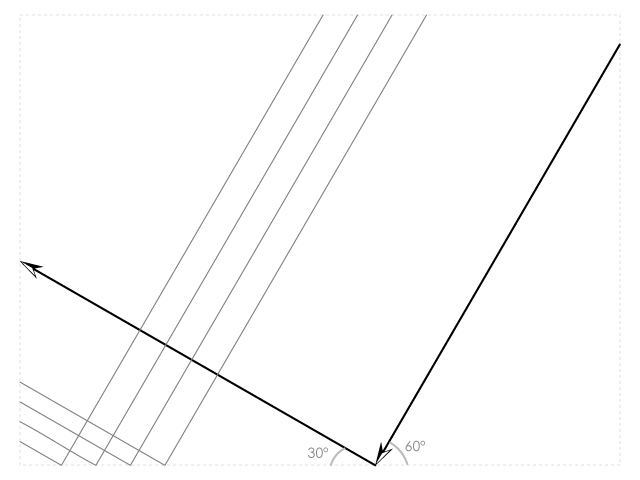
Image 8.3: Workout Test Sheet-3
2. Task-4: Equidistant inclined lines - between two predefined polylines: Mark the start and end lines on a cartridge sheet, as shown in image 8.3 below and draw 10 equidistant lines between them. Use a measuring ruler ONLY to mark the 20 cm and 30 cm distances, as specified in reference image 8.4 below.

Image 8.4: Workout Test Sheet-4
3. Task-5: Rectilinear composition using inclined lines: This is to test the improvement in your length as well as angle estimation skill. Draw multiple rectilinear shapes oriented at various orientations (30, 45, 60 and 90 degrees), as discussed shown in the image 8.5 below. Again, Do NOT use a protractor. Use it ONLY to check correctness later.
• draw an array of 4 squares of side 5cm, oriented at 30 degrees, with 2cm gap such that they visually form a larger square. Repeat for 45 and 60 degree orientations.
• using 5cm and its multiples as drawing lengths, generate various rectilinear shapes of your choice (few samples are shown in (ii) in image 8.5 below) all oriented at 30 degrees. Maintain a uniform gap between the shapes. Repeat similarly for 45 and 60 degree orientations.
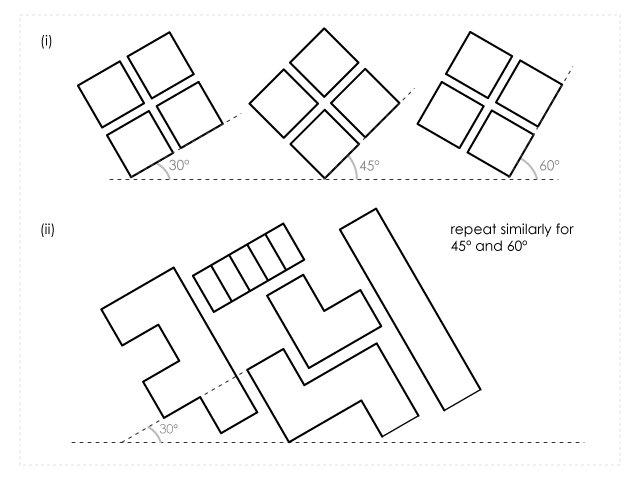
Image 8.5: Workout Test Sheet-5
< Workout Test Ends >
Sense of Perspective Space: Test
Objective: Drawing Geometric Objects in Space - (Composition 2) - using Floor Grids
Using the two floor grids provided earlier, draw 3D Sketch Views of the composition below from
(a) Picture plane AA' and
(b) Picture plane BB' [Download...D8_geometric-objects-in-perspective-space-2-worksheet]
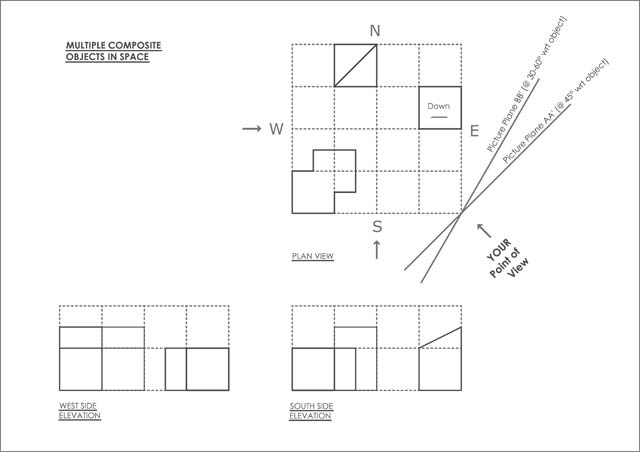
Image Workout Test 2 Reference Sheet
4. Review:
After you finish, review the composition by superimposing the tracing paper you drew on over a correctly printed solution sheet [D8_geometric-objects-in-perspective-space-2-at-45-deg-solution-sheet] [D8_geometric-objects-in-perspective-space-2-at-30-60-deg-solution-sheet] < Sense of Perspective Space: Test and Day 8 End >
-----------------------------------------------------------<< End of SESSION 2 >>--------------------------------------------------------
Day 9 Preview
Tomorrow we begin with Warm ups, revise all that we did in the Workouts in Session 1 and 2.
Under Workouts, we learn to draw curvatures
Under Sense of Perspective Space, we draw multiple cubes and cuboids in 2-point perspective, where atleast one of them touches the picture plane.
Downloads for Day 9: See PRINTING INSTRUCTION first.
1. D9_Grid-reference-sheet-for-session-3-4-5
2. D9_Vertical-Cylinder-within-45-deg-Cube_Solution
3. D9_Horizontal-Cylinder-within-30-60-deg-Cube-Option-a_Solution
4. D9_Horizontal-Cylinder-within-30-60-deg-Cube-Option-b_Solution