Design Course
Freehand Sketching
Rediscovering the Act of Sketching
by
Day 6
Introduction to Day 6
Today, under Warm up, we quickly revise all that we did in the Workouts in Session 1 as well as Day 5.
Under Workouts, we learn to draw parallel inclined lines at 30-60 degrees correctly.
Under Sense of Perspective Space, we draw geometric objects in 2-point perspective, using a 45 degree floor grid, with atleast one of the objects touching the picture plane.
Preparation:
• Download and Print:
1. D6-7_Geometric-Objects-in-Perspective-Space-1_Exercise
2. D6_45-deg-Floor-Grid
3. D6_Geometric-Objects-in-Perspective-Space-1-at-45-deg_Solution
• Newsprint sheets
• Tracing sheets
• Soft pencils
• Measuring ruler/scale
• Long ruler/T-square and set squares
• Music
Overall Time Plan:
• Warm up : 15 mins.
• Workout : 60 mins.
• Sense of Perspective Space : 90 mins.
Warm up
15 minute Exercise:
0-5 mins : Practice very fast hand and body movements while drawing Horizontal, Vertical and Inclined Lines
5-15 mins : Repeat the various workouts covered in Session-1, and upto inclined lines @ 45 degrees of the previous day WITHOUT the underlay grids, using SIGNATURE GRIP.
While drawing these, remember to:
1. Draw them for various lengths.
2. Draw them in either direction
3. Draw them at various pace - fast, slow, fast to slow in a single line, etc.
This practice of initially drawing the lines fast and then slowing down will help your body get into smoother drawing action for the workouts and perspective exercises ahead.
<Warm up Ends>
Workout
You will need grid G7 and G8 for today's Workout session
Parallel Inclined Lines @ 30 degrees - from bottom Left to top Right
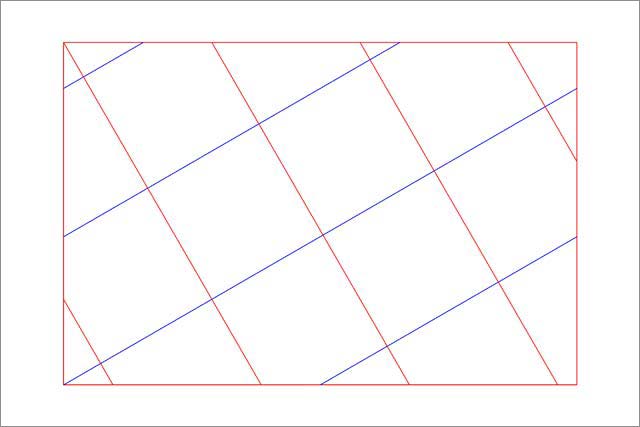
Draw Parallel Inclined Lines of 30 degree inclination from bottom Left to top Right of various lengths, taking reference of the inclined lines on the grid template. Try to control the end points of the line such that they fall in 60 degree alignment (Use Template T7).

Image 2.1: Grid 7_5x15 with blue diagonals @ 50mm and red diagonals @ 150mm
Attachment Size ![]() Day-6-V-1-Parallel-Inclined-Lines-at-30-degrees-from-bottom-Left-to-top-Right.mp4
Day-6-V-1-Parallel-Inclined-Lines-at-30-degrees-from-bottom-Left-to-top-Right.mp41002.61 KB
Parallel Inclined Lines @ 30 degrees - from bottom Left to top Right
Attachment Size ![]() Day-6-V-3-Parallel-Inclined-Lines-at-60-degrees-from-top-Left-to-bottom-Right.mp4
Day-6-V-3-Parallel-Inclined-Lines-at-60-degrees-from-top-Left-to-bottom-Right.mp4978.36 KB
Parallel Inclined Lines @ 30 degrees - from top Right to bottom Left
Now, using the same grid(Template T7), reverse your direction of drawing the line from previous case, i.e. start from top Right and end at bottom Left.
Parallel Inclined Lines @ 60 degrees - from top Left to bottom Right
Using the same grid (Template T7), draw Parallel Inclined Lines of 60 degree inclination from top Left to bottom Right of various lengths, now taking reference of the inclined lines running perpendicular to the parallel inclined lines @ 30 degree inclination.
Attachment Size ![]() Day-6-V-2-Parallel-Inclined-Lines-at-30-degrees-from-top-Right-to-bottom-Left.mp4
Day-6-V-2-Parallel-Inclined-Lines-at-30-degrees-from-top-Right-to-bottom-Left.mp41.01 MB
Parallel Inclined Lines @ 60 degrees - from top Left to bottom Right
Parallel Inclined Lines @ 60 degrees - from bottom Right to top Left
Next, as earlier, reverse your direction of drawing the line, i.e. start from bottom Right and end at top Left, using the same template (Template T7)
Attachment Size ![]() Day-6-V-4-Parallel-Inclined-Lines-at-30-degrees-from-bottom-Right-to-top-Left.mp4
Day-6-V-4-Parallel-Inclined-Lines-at-30-degrees-from-bottom-Right-to-top-Left.mp41005.67 KB
Parallel Inclined Lines @ 60 degrees - from bottom Right to top Left
Note: Observe that the forearm is at 60 degrees to the line. Practice this.
Once you are confident, try the following:
Draw 15 lines, with equidistant spacing within each 5 cm of the 30-60 degree grid. Lines to be of 15, 30, 45 and 60 cm lengths as done earlier for lines inclined at 45 degrees on the previous day.
Note: Remember to use Signature Grip for all the exercises henceforth. Begin each line with your signed initial and extend it as its continuity for all these exercises if you feel the need to practice your natural signature grip.
Change of Pace within Parallel Inclined Lines
Repeat all the exercises you practiced till now on the 30-60 grid (Template T7) by changing the pace as follows:
1) Change Pace : Fast, Slow
2) Change Pace within the Line: Fast to Slow, Slow to Fast.
Parallel Inclined Lines @ 30-60 degrees Starting and Ending Away from Grid
Also practice drawing Inclined Lines @ 30-60 degrees by Starting and Ending away from Grid, as we did on the previous day, as shown in the video below.
Attachment Size ![]() Day-6-V-3-Parallel-Inclined-Lines-at-60-degrees-from-top-Left-to-bottom-Right.mp4
Day-6-V-3-Parallel-Inclined-Lines-at-60-degrees-from-top-Left-to-bottom-Right.mp4978.36 KB
Parallel Inclined Lines @ 30 degrees from top Right to bottom Left Starting Away from Grid
Now, draw 45 lines, with equidistant spacing within each 15cm 30-60 degree grid (Template T8) of 15, 30, 45 and 60 cm lengths as we did before for the parallel horizontal and vertical lines.
Grid Template-8: 30-60 deg. 15x15 with blue and red diagonals @ 150mm
<Workout Ends>
Sense of Perspective Space
Objective: Drawing Geometric Objects in Space (Composition 1) - using a 45 degree Floor Grid
Recall Day 5, +...concept: extending....(link) and applyit and do the following
Provided below is the Plan and 2 Side Elevations of multiple objects in space. [Download..D6-7_Geometric-Objects-in-Perspective-Space-1_Exercise]. Draw a 3D view of this composition from the point marked 'Your Point of View' on TRACING PAPER. Use the 45 degree Floor Grid provided generated from a Unit Cube in the same orientation. [Download...D6_45-deg-Floor-Grid]. See PRINTING INSTRUCTION first.
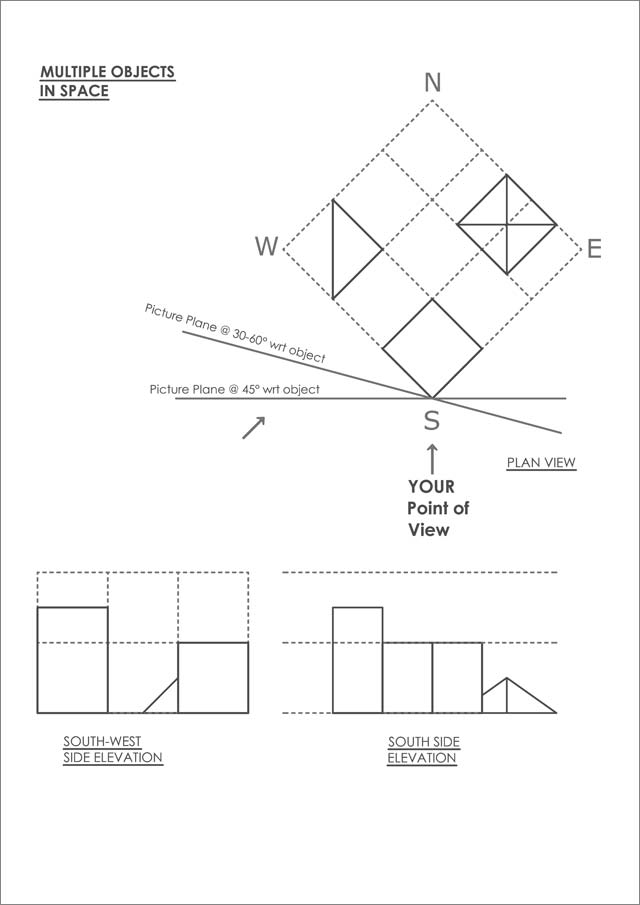
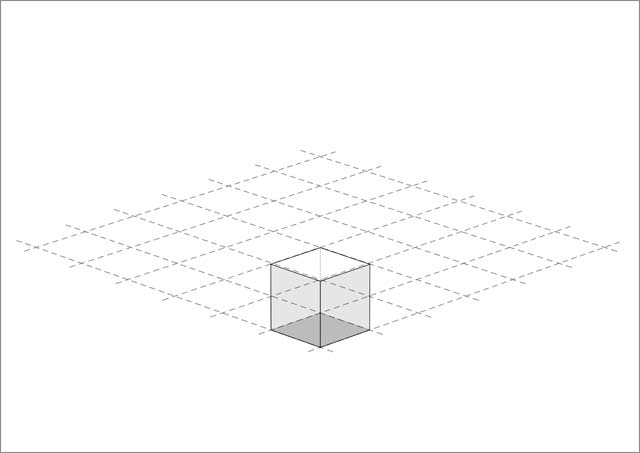
45 Degree Floor Grid
After you finish, superimpose the tracing paper you drew on over a correctly printed solution sheet to review your composition. [Download...D6_Geometric-Objects-in-Perspective-Space-1-at-45-deg_Solution]
<Sense of Perspective Space and Day 6 End>
Day 7 Preview
Tomorrow under Warm up, we quickly revise all that we did in the Workouts in Session 1 as well as Day 5.
Under Workouts, we learn to draw parallel inclined lines at 30-60 degrees correctly.
Under Sense of Perspective Space, we draw geometric objects in 2-point perspective, using a 45 degree floor grid, with atleast one of the objects touching the picture plane.
Downloads for Day 7: Remember this important PRINTING INSTRUCTION while printing!
1. D6-7_Geometric-Objects-in-Perspective-Space-1_Exercise (The same worksheet is used tomorrow)
2. D7_30-60-deg-Floor-Grid
3. D7_Geometric-Objects-in-Perspective-Space-1-at-30-60-deg_Solution