Design Course
Freehand Sketching
Rediscovering the Act of Sketching
by
Day 18
Introduction to Day 18
Today, under Warm up, we quickly revise all Workouts in Sessions 1-4, and upto Day 17.
In today's practice session, we learn to draw repeating curve profiles such as sinuous lines and springs.
Under Sense of Perspective Space, we learn how to draw an object with two faces of interest, i.e. a cooking range (an example of a (b) Typically Rectangular Objects, discussed yesterday)
Preparation:
• Download and Print:
1. D17_5cm-One-Point-Perspective-Floor-Grid (Optional, if preserved from Day 17)
2. D18_Cooking-Range_Exercise
3. D18_Cooking-Range-in-1pt-Pers_Solution
• Tracing sheets
• Soft pencils
• Measuring ruler/scale
• Music
Overall Time Plan:
• Warm up : 15 mins.
• Workout : 65 mins.
• Sense of Perspective Space : 90 mins.
Warm up
15 minute Exercise:
0-5 mins : Practice very fast hand and body movements while drawing Horizontal, Vertical and Inclined Lines, Curvatures, and Radial Lines and Rings, recalling all earlier sessions.
5-15 mins : Now, repeat the various workouts covered in Session-1-4, and upto previous day by CHANGING TOOL (use a standard sketchpen/marker today). As a warm up exercise using a different tool, the focus should be on maintaining line uniformity as well as good fluency of the drawn lines.
While drawing these, remember to:
1. Draw them for various lengths, and diameters.
2. Draw lines in either direction and curvatures, both clockwise and anti-clockwise.
3. Draw them at various pace - fast, slow, fast to slow in a single line, etc.
This practice of initially drawing the lines fast and then slowing down will help your body get into smoother drawing action for the workouts and perspective exercises ahead.
Once you have discovered your 'comfort zone' with a tool, try switching hands, i.e. challenge yourself to do some of the exercises using the hand you don't normally use (right-handed use left hand and vice versa)!
<Warm up Ends>
Workout
Sinuous Lines and Springs
Drawing repeating curve profiles such as sinuous lines and springs improves line control and fluency. This is because in order to draw these accurately, one has to pay attention to both:
(a) height from reference line or 'amplitude', denoted by 'a' henceforth, and
(b) distance between two repeating points or pitch, denoted by 'p' henceforth.
Note that the span of a complete wave is its 'wavelength'(w) while 'frequency'(f) represents the rate at which the wave is repeated.

Image 18.1: Sinuous Line Parameters
Additionally for springs, we shall use 'x' to refer to the maximum length of contained space within a turn, 'x1' for the distance between two turns 'o' in case of an overlap in successive turns, as elucidated in the image 18.2 and 18.3 below. Also note that 'amplitude' refers to the TOTAL height in case of springs.


Image 18.2 and 18.3: Spring Parameters
1. Aim: Drawing repeating curve profiles: Sinuous Lines and Springs correctly
• Improve line quality
• Improve fluency
2. Set up:
• Tracing sheets, soft pencils, music
• Grid - G1 and G2
3. Exercises:
Horizontal and Vertical Sinuous Lines and Springs
Variations explored: Offsetted, Tilted, Progressive/Regressive
18.1) Horizontal Sinuous Lines - 15 mins - 2 sheets

Image 18.4: Horizontal Sinuous Lines (on a 15x5 grid, G1)
Draw Horizontal Sinuous Lines on the 15x5 grid (Use grid G1). Maintain equidistant spacing of 2cm between successive lines. Draw sets of 10 lines for each. To begin with, draw for the following pitch values, maintaining amplitude a = 5cm:
(a) p = 5cm
(b) p = 15cm
(c) p = 30cm
Note: It is important to maintain consistency in the pitch and amplitude throughout.
Repeat now for a = 10cm. Start by drawing from the left. Also practice for your own pitch and amplitude variations, as shown in the sample sheet above. Maintain good offset between successive sinuous lines. The following diagram explains how.

Image 18.5: Considerations while drawing successive sinuous lines
18.2) Horizontal Springs - 15 mins - 2 sheets

Video 18.1: Horizontal Sinuous Lines and Springs
Now, on a fresh overlay sheet, practice drawing springs using the same grid G1 for:
(a) a = 5cm; p = 7.5cm and space contained within turn (x) =2cm. Mark off pitch distance and 'x' for the first wave, to get an approximately accurate idea, then repeat without any further reference marks.
(b) a = 10cm; p = 3cm; x = 3cm
Also try for overlapping springs, putting in amplitude and pitch values of your own for the overlap values:
(a) o = 1cm
(b) o = 3cm
(c) o = 5cm
Practice a few of these by reversing the orientation, i.e. turns facing down. Also try drawing these from right to left.

Image 18.6: Horizontal Springs (on a 15x5 grid,G1) - Turns with Gap, Touching or Overlapping
Avoid the common errors such as unequal pitch or amplitude while drawing springs. A few of them are discussed below as pointers regarding what to avoid!

Image 18.7: Common errors while drawing springs
18.3) Offsetted Horizontal Sinuous Lines/Springs - 10 mins - 1 sheet
Another variation worth trying is to start each subsequent sinuous line/ spring at an offset distance of say 2cm, adjacent to previous line. Practicing this improves wavelength and height consistency while drawing. Continue to use grid template G1, and start by drawing for pitch =15cm, varying amplitude as:
(a) a = 10cm
(b) a = 15cm
Repeat for atleast three more different amplitude and pitch values of your choice for sinouous lines as well as springs.

Image 18.8: Offsetted Horizontal Sinuous Lines and Springs
Note: The 'peaks' and 'valleys' must all follow the grid alignments.
18.4) Tilted Horizontal Sinuous Lines/Springs - 10 mins - 1 sheet
Draw a SINGLE tilted sinuous line on the 15x5 grid template G1 for the following values:
(a) a = 5cm; p = 7.5 cm; tilted at 60 deg. towards right, and
(b) a = 10cm; p = 7.5 cm, tilted at 75 deg. from left, as shown in sample sheet.
Redo for springs with 2cm offset gap,for the following values:
(a) p = 10cm, tilted at 45 deg. towards left
(b) p = 15cm, tilted at 45 deg. towards right, or try more variations with any values of your choice.

Image 18.9: Tilting Horizontal Sinuous Lines and Springs
18.5) Progressive/Regressive Horizontal Sinuous Lines/Springs - 15 mins - 2 sheets
 Image 18.10: Progressive and Regressive Horizontal Sinuous Lines
Draw these curve profiles with gradually varying amplitudes from left to right on G1 for:
(a) min. a = 5cm; max. a = 10cm, and frequency f = 6, as shown in sample sheet above.
(b) max. a = 12.5cm; min. a = 2.5cm, f = 8.
Repeat similarly for progressive and regressive springs, for pitch, amplitude and frequency values of your choice.
Note: It is important to maintain the smoothness in the variation of amplitude such that if a line is drawn connecting all peaks/valleys, it will give a smooth curve. This will also depend upon the consistency of pitch.

Image 18.11: Progressive and Regressive Horizontal Springs
<Workout Ends>
Sense of Perspective Space
1. Aim: Drawing an Object with Two Faces of Interest in One-Point Perspective: Cooking Range
2. Set up:
Tracing sheets, measuring ruler.
3. Exercise:
Using the Floor Grid provided on the previous day as reference [or download it here...Floor Grid for One-Point Perspective], download the worksheet and draw this Cooking Range in One-Point Perspective. [Download...D18_cooking-range-worksheet]
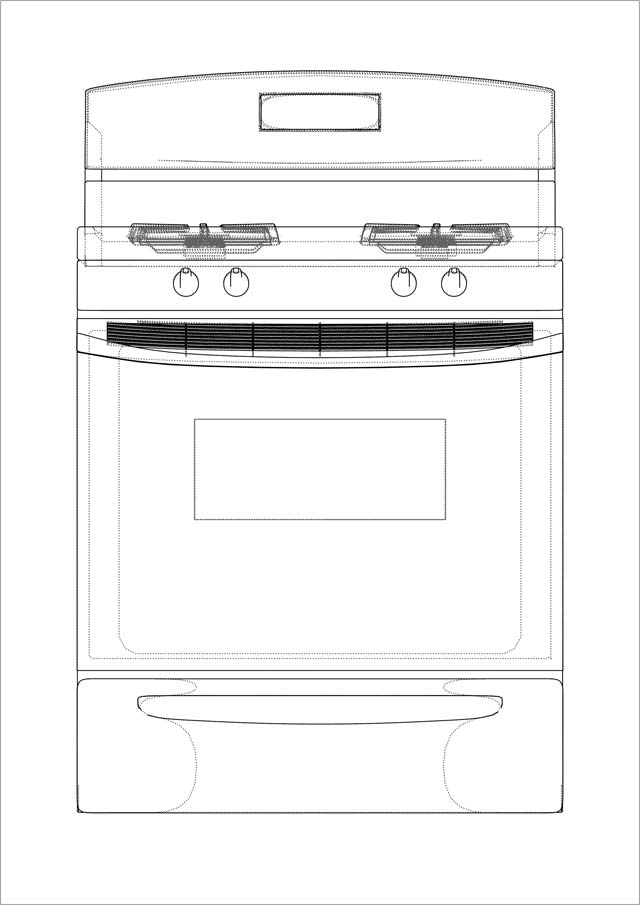
Image 18.12: Cooking Range Worksheet

Image 18.13: Floor Grid in One-Point Perspective
4. Review:
Compare your drawing by overlaying it on a correctly printed version of the solution provided. [Download...D18_cooking-range-solution-sheet]
Quick Tip: Did you realise that there is no difference between the front view of a product in perspective from its front elevation? Hence, to deliver quick 3D renders of a product concept in perspective, simply draw the required front elevation and then extend the vanishing lines to complete its one-point perspective view!
< Sense of Perspective Space and Day 18 End >